When I first started my pond two years ago, the only aeration/moving water was from a small fountain and sprinkler head with an attached foam filter sitting in the middle. Although this was adequate to keep the fish alive and the pond from turning into a scummy slough, I would have preferred something that looked a little more natural. Next year I had a waterfall.
One of the more common ways of getting a waterfall is to buy one ready made, but if you’ve ever priced some of the molded fiberglass waterfalls, you’ll know most don’t come cheap. The ones we can usually afford are rather small as well. Sometimes they are no more than miniature water slides, and must be positioned and landscaped so they are sitting a few inches above the surface in order for water to “fall” into the pond. Some people have the patience and talent for such landscaping, but there are other ways to get a waterfall.
I chose a “home-made” approach. All you are doing is making a few small pools, setting them up so they slightly overlap, and pumping pond water to the top one. Each pool has a notched edge where the water drains out into the next, and then back into the pond. The bottom of the basin is made of plywood, and the sides are made of landscaping timbers. It took me (and another person) about 4 to 6 hours of construction and the whole thing was ready to put up.
The first thing you must do is decide how big and what shape to make the basins. Mine were a hexagonal shape, and had an outside diameter of about 32 inches. This tells you how much material you need. Three-quarter inch plywood, which costs about $35 per 4X8 sheet is fine. Depending on the size of basin you choose, you can get away with 1/2″. Landscaping timbers cost around $3, and are 8 feet long. Both can be found at building supply stores. Although a miter saw and a circular saw are the most efficient tools for making the necessary cuts, all that is needed is a hand saw and a bevel to achieve the same results. You don’t necessarily need to waterproof or treat the wood, since it will have a layer of plastic over it, but the pools will last longer if you do (4 to 5 years as opposed to 10+).
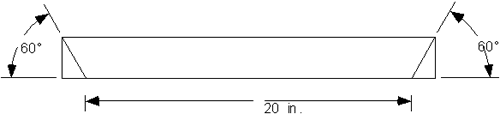
To find the angle at which to cut the timbers, take 360 degrees and divide it by the number of sides your pools will have. Before making any cuts, decide how long to make the sides. One thing I did was to cut out a paper hexagon the same size as the basins beforehand, both to see how big they would really be, and to make sure I had room to fit them where I wanted them.
Once you’ve decided on a length, (say, 20 inches), and a shape (say a hexagon), cut the plywood as shown. Next, cut the timbers for the sides as shown in Figure 2 (use the angles for the shape you’ve chosen here).
You must also choose how deep to make the pools. I would recommend (if you’re using timbers) two layers, or 6 inches deep. One layer will make the basins more like plates, three or more layers deep and they tend to get too big and heavy to handle.
Since the timbers have two flat sides, they are easily attached to the plywood. It’s best if you attach the bottom row from the bottom with 1.5 to 2 inch #8 or #10 wood screws. To attach the second row, I drilled a small pilot hole through the top timber and attached them to the bottom row with three-inch screws. 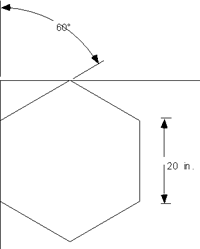
When you have everything together, cut a drain in the top of one side in each basin. You can do this before or after assembly, since these basins (when properly made) are very solid. The notch shape affects how the water falls. A downward sloping, fan-shaped notch will spread the water out in a wide sheet, while a downward sloping pointed notch will drain the water like milk flowing from a carton. An upward- sloped or even level notch of any shape will only let water slop down the edge of the basin like an over-flowed cup of water, which will rot the wood. Make sure the water flows over an undercut edge such as the rim of the plastic or even a piece of tin under the metal, or again it will slop down the front of the wood rather than flowing into the next pool. The size of the notch depends on how fast the water is being pumped in, but starting with a smaller notch and increasing it’s size, if necessary, through trial and error worked for me.
To waterproof the inside, all that is necessary is one layer of 6 mm poly plastic stapled down or secured under a small strip of wood around the rim of the basin. Six mm refers to the weight of the plastic, and you’re safer with thicker plastic. You’ll have to replace it each year, but a small role of this plastic (several hundred square feet) only costs about five or six dollars. Pond liner can be used too, but it is expensive, plus you have to cut it in a shape and size to fit the basins. Even if you can figure out the dimensions, more than likely you will have a lot of big folds and a tough time getting it in.
When the basins are done, they must be set up so they drain into each other and the pond. This can be done many ways, but if they’re not flat on the ground (a hill), make sure that they’re sitting on something solid. Full of water, most will weigh over 100 pounds. Mine were set on cinder blocks at varying heights. Because you have separate units, the waterfall can be set up in many different ways and patterns. That’s up to you. Something you should do is make sure they are level so they drain where you want them to, not all over the ground. You must be careful doing this as I have first-hand experience in the mess you can make when the pools are not “level enough”.
Make sure your pump can handle getting the water from the pond up to the top of the falls without wearing it out. Once there, it can go through a filter, or directly into the basin. I’ve got my filter at the top of the waterfall behind some potted plants and a tree branch, where it isn’t very obvious.
Depending on how far the water falls from basin to basin, a few drops might splash out onto the ground. Such a small amount of water will evaporate before making any mud, and is usually replaced by rain. To make the whole thing look better, you can set potted plants around the rim of the basins. The plants are constantly being watered by the splashing water, and give the waterfall a more natural look, particularly if they have flowers.
The best asset of this kind of waterfall is that it can be changed around very quickly and easily. The basins can be set far apart to be like a small stream, or almost on top of each other for a vertical drop. Their numbers and size are also flexible. The basin’s size allows them to be movable, but they are solid enough not to need additional landscaping or heavy rocks to keep them in place. ?